29 March 2018

Season-to-date Snow-depth Chart

The chart speaks for itself.

Looks like the trend*might* be towards less overall snow accumulation, but "the melt" has not begun in earnest. More frequent snowfall is the trend over the last month and in the near-term forecast.

My shipments of bits and pieces for the porch and stair railing started arriving this week. For this weekend I'm torn as to whether I should go work on the plumbing at KnArrow Haus or tend to home beautification before our extended family descends up on us in a couple weeks for the nuptials of my daughter.

26 March 2018

New Tools & Railing Supplies

Extracurricular family activities (basketball playoffs and wedding preparation) have grounded me the last two weekends from heading up to the cabin (along with some frigid, snowy weather last weekend), but I've continued to be pretty active acquiring some needed tools and supplies.

New Tools

I bought both tools below from Lowes (free shipping!) after looking at all the prices on-line, Lowes was competitive with other onlines sites, AND if I have any troubles they'll be easy to return to a local store.
Bought a new impact driver. Soooo much easier to use when driving screws -- for plumbing straps, some additional framing. And I'm going to need to use it on the railing, siding, ceiling planks, wall board, etc. 

As I documented previously, I somehow broke the fence on my miter/chop saw. And since it's an off brand, I cannot find a replacement fence. So I bought a new compound miter saw -- for cutting plumbing pipe and ceiling planks. 

Railing

I've been working evenings trying to figure out my design and strategy for railings on the front porch and back deck, and for the internal stairs and upper landing. Took me a long time to winnow down the choices to something I'm satisified with. 
I went with Schedule 40 black anodized aluminum pipe for all the railings, inside and outside. 

At first I thought I was going to have to settle for raw aluminum or galvanized steel, but I really wanted BLACK pipe with silver fittings (for that "industrial" look). The thought of having to buy pipe then take it somewhere to get it powder coated or anodized was not very appearling. I found the pipe at an industrial lighting (stagelightingstore.com) already anodized in black. They cut the 20ft pieces in 1/2 for me at no charge making them cheaper to ship. I bought enough for all the interior and exterior railing. 

Railing Fittings

I've ordered only the fittings for the porch and deck so far. But waiting to order the fittings for inside until the staircases are fully installed and the floors are in. Ordered everything from globalindustrial.com -- they offer fittings that look exactly like the posh/popular Keep Klamp fittings, but at a better price.

Fitting on the front porch from the post to the rail nearest the stairs.
T-fitting for the rail and post in the middle of the back deck.

Elbow fitting for outside corners on the porch and the back deck.


I'll use this fitting to mount the posts to the outside of the porch and deck.


These fittings will be used to mount the rail on the porch to the beam, and on the back deck to the side of the cabin.

Stainless Cable & Fittings

I've also ordered the cable and fittings that will be used to go horizontally every 4 inches in between the posts. After a fair amount of price research, I ended up getting the various pieces from several different sellers on ebay.

3/16" 1x19 Stainless Steel Cable Railing Wire Rope Grade 316 (500 feet). Plenty to do the exterior, but probably a bit short to complete everything inside.  The next size up was 1000 feet -- way too much. I'll purchase the rest after I know a more exact amount for the interior.
These secure the cables to the big angled wood beam on the front porch and to the sides of the house on the back deck.

These will secure the cables in the end post on the front deck.

These will will protect the holes in the corner where the cable routes through.

I originally wanted to do the swageless fittings for all the cable because they seem so convenient and look so nice. BUT they're A LOT MORE expensive. So I've settled for swaging the cable into the fittings on each end.

Cost so far for the railing materials:
  • $1344 ($1080 + $264 shipping) for the Schedule 40 1-1/2" black anodized aluminum pipe.
  • $410 for the pipe fittings.
  • $410 for the 3/16" cable and fittings.
I'll have additional costs when I order the pipe fittings and cable fittings for the interior, but at least I've got the pipe and most of the cable to complete everything.

Stay tuned next for...

...the return to the miserable torture of rough plumbing the drains.

11 March 2018

Rough plumbing and chickening out


It was a beautiful day. I did not have to spend more than 5 minutes digging out the snowmobile, and I pulled right out on the first try. A marked improvement over last time.


Another foot of snow since last week. And all the snow on the roof from last week fell off the roof and has created a major ice mound on the side of the haus.

I did a panorama on my camera to capture this, which is why the beam looks a bit odd.

Finally, I actually drilled a few more holes for rough plumbing. But then I got psyched out after I realized some of the plumbing runs will have to go through some major, structural glulam beams. Any time you're doing something for the first time, regardless of how many hours you've spent on YouTube learning about the task, the task takes at leat 5 times as long as it should.

Staring at the ceiling.
Head scratching.
Measuring.

The above picture is of the main floor ceiling.  The drain from the main bathroom sink upstairs will come down to the right of the major beam (with the blocking for the tie straps). But then that drain needs to go to the far wall and down to the main plumbing stack -- but on the far wall that's also a 5 inch structural beam that the floor jambs are nailed to. No going through that. 

It's frightening to think about drilling a 2 inch how through the beams. And besides, I'll need to get a Forstner bit for that -- a hole saw literally "won't cut it."

I've got the same problem with the drain for the main floor powder room sink with the beams in the garage. And with the kitchen sink...

Pondering.
Measuring again.
Chickening out. 

So, in all I got about 3 holes drilled in the upstairs for routing plumbing. Then I chickened out.

"Chickening out" looks like spending 20 minutes soaking in the sun on the front porch.

Another view of the ice and snow mound created by the roof shedding snow.

Our power meter, shown at the bottom left corner of the screen, is now covered with snow.

I love the clump of snow resting at the top of the skinny tree -- almost looks like an "ice nest."

View from the front porch out to the street and the snowmobile. 
Opposite view from above, looking from teh snowmobile to the front of the haus.

View of the parking turn around area that puts the No Parking sign shown at the top in proper perspective. You can see a snowcave someone has dug to the left of the sign.

04 March 2018

Digging out after 3 ft of snow last week

Digging out the snowmobile pretty much busted my chops yesterday.  It took 2 hours to get it completely dug out and up to the cabin, and by the time I was too exhausted to get much work done.  I shoveled the decks and took some measurements for stair rails. And I only had an hour before I had to leave to return home for my daughter's basketball game.

My snowmobile was burried just in front of the red ATV you can see to the left of the STOP sign.

The green snow stake marks the front of the snowmobile.

3ft of snow since last Saturday.

The beginning of digging it out.

Even after all the digging, I had a hard time freeing the snowmobile. A friendly neighbor had pitty on me and helped me pull it out.  We each grabbed a front ski and pulled it out manually. Trying to drive it out just had the track digging deeper in the snow.
NOTE TO SELF: When you let someone borrow your snowmobile, make sure you tell them to fill in the hole with snow after they dig it out. 

So that it looks like this when you leave:

Over 30 feet of snowfall this year.

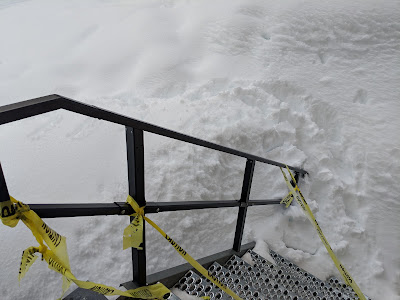
Entrance to the stairway is a bit precarious.

The now is now well above the front deck. This is the side where the roof sheds.

No caption necessary.

Here's a time lapse over the last few months.